EXPORT SETTINGS FOR PHOTOSHOP:
The instructions below are one of many ways to prepare your images for uploading to Mytography®. You are free to use any method you see fit as long as the images meet our criteria.
1. COLOR MANAGEMENT
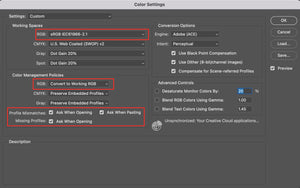
- Open Photoshop and go to Edit ---> Color Settings in the menu bar.
- Under Working Spaces and for RGB files select sRGB IEC61966-2.1
- Under Color Management Policies next to RGB select Convert to Working RGB
- Next to Profile Mismatches check Ask When Opening and Ask When Pasting
- Next to Missing Profiles check Ask When Opening
- Click OK to save your changes
Regarding ICC Color Profiles: Two of the most commonly used ICC profiles for RGB images are Adobe RGB (1998) and sRGB IEC61966-2.1. 8 color sublimation printers operate off of the Windows operating system, hence the sRGB IEC61966-2.1 color profile. We know most of you will be doing design work on a Mac, if you accidentally embed another color profile such as Adobe RGB (1998) we will notify you before converting your image to the correct color space.
2. OPEN IMAGE
From the Menu Bar select:
• File ---> Open
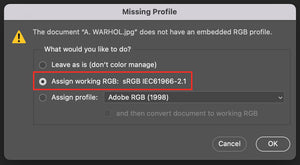
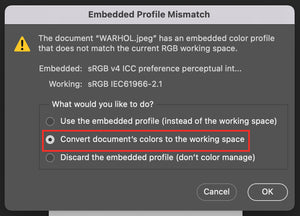
With your new color settings assigned, when you open a file that is in a color space other than sRGB IEC61966-2.1, Photoshop will prompt you to convert to the working color space.
• For the Missing Profile, select the radio button for Assign working RGB: sRGB IEC61966-2.1 and click OK to continue.
• For the Embedded Profile Mismatch instance, select Convert document’s colors to the working space and click OK to continue.
• If you do not recieve a prompt that means your image was already in the correct color space.
3. CONFIRM RGB COLOR & 8 BITS / CHANNEL
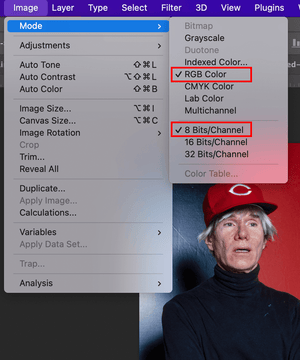
Once your image has been opened or imported in Photoshop, ensure that both RGB color mode (even for black & white photos) and 8 bits per channel has a check mark beside them. If other options are selected, change them to match these settings.
From the Menu Bar select:
• Image ---> Mode ---> RGB Color & 8 Bits/Channel
4. CHOOSE YOUR ASPECT RATIO & CROP IF NECESSARY
One method for sizing your image perfectly is by first selecting the crop tool from the Tool Bar and then selecting the proper aspect ratio from the dropdown in the Options Bar. For this example we are using a 2:3 aspect ratio. Differnent aspect ratios can be chosen from the dropdown or entered manually. Clicking the double arrows (circled in green) will swap the ratio, allowing you to toggle between portrait and landscape.
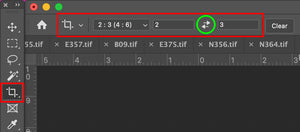
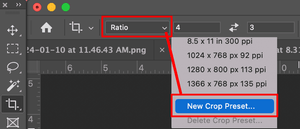
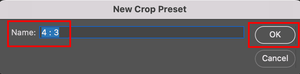
For instances where you manually input an aspect ratio that is not predefined by Photoshop, you can save the preset for future use. From the dropdown you can select New Crop Preset, name it what you like and click OK. The preset will now be saved in the dropdown for future use.
Depending on what settings you have selected, you may encounter issues with the crop tool "snapping" the the edges. To gain exact precision when using the crop tool, in the Menu Bar choose
• View ---> Snap
Make sure there is NO checkmark next to the Snap option and you will gain more control over the crop tool.
5. ADJUST IMAGE SIZE BASED ON YOUR SOURCE IMAGE
From the Menu Bar select:
Image ---> Image Size
Width x Height & Resolution: We accept 150 to 300 dpi images at the resolutions listed in our Image size chart (click here), OR any pixel dimension and DPI that falls between the "GREAT" & "BEST" range for any give aspect ratio. Choose the highest dimensions you can based on the size of your source image. In this example we are sizing for a 24" x 36" (2:3 aspect ratio) print at 300 dpi with pixel dimension of 7200 x 10800
It is important to note that you can adjust width, height & resolution DOWN however adjusting a small image up, for example a 72 PPI image to 300 PPI image will not get you better resolution and will lead to poor prints.
Zoom in at 100%: There will be instances where you might zoom in on your image when preparing it. This is fine with images that are already at a high resolution. Where this may cause a noticable loss in quality is when your image is already at the low end of the resolution scale. To get a good visual of how your image will look when printed, in photoshop, zoom in to 100% to see how it looks.
6. EXPORT
The final step is to export your image.
If you did any work on the image, make sure all layers are flattened before saving your final copy.
From the Menu Bar select:
• Layer ---> Flatten Image
Next:
From the Menu Bar select:
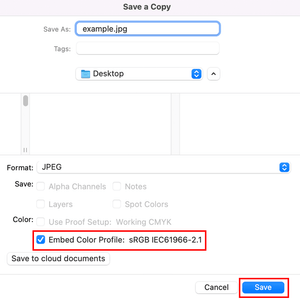
• File ---> Save a Copy
• JPEG, PNG, HEIC and TIFF files are accepted, however JPEG is preferred
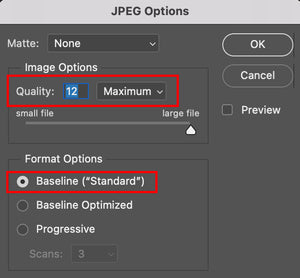
JPEG
- 8 Bits per channel
- Baseline Standard encoding
- Maximum Quality
PNG
- 8 bits per channel
TIFF
- 8 bits per channel
- No Layers or Alpha Channels
- Image Compression = LZW
- Pixel Order = Interleaved
• We have a 500 MB upload limit
• IMPORTANT: When saving your final image, you MUST check the Embed Color Profile checkbox in the Save dialog box. Failure to do so will cause inaccurate colors to print. Check the box that says:
Embed Color Profile: sRGB IEC61966-2.1
• Click Save to export your file
Once you click Save, the JPEG Options Box will appear. Under Image Options, set your quality to 12 Maximum and under Format Options make sure Baseline ("Standard") is selected. Once done, click OK and your image will be saved.
You now have a properly sized and formatted image that is ready to be uploaded and printed.